Tutorial by Joel Stutz, www.visualcenter.ch
nCloth is about having an nMesh (ex. shirt) collide against a passive Collider (ex. skin) to simulate realistic cloth behaviour.
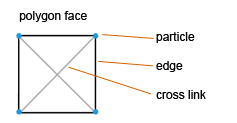
Nucleus Cloth is a stable system of linked particles to simulate a wide variety of polygon surfaces.
This network of particles is connected by links, which together create a dynamic mesh.
Links mantain the distance between particles, and cross-links mantain the angle between links, stabilizing the nCloth and preventing cloth behavior like shearing.
For create a cloth mesh around a character, select it and nMesh> Create nCloth
In the option box you have 2 options:
Remember, after assigning an nCloth you might gonna loose textures or fur, which you can easily assign again.
Important You can smooth the nCloth for render, however, the increased resolution will not have any effect on any calculations, for they are done directly from the original mesh, not the nCloth
select an object against which an ncloth should collide and nMesh> Create Passive Collider
is the heart of all n calculations, if you select a nMesh, in its AE the last node is the nucleus.
| Enable | Disable this feature for disable all nucleus calculations |
| GRAVITY AND WIND | |
| Gravity | This is the default gravity setting for all nCloth, it is not related to the field gravity. If you set it to be 0, cloths will not fall. |
| Gravity Direction | By default y = -1, meaning that cloth falls down. |
| Air Density | how strong the wind affects the cloth, a value of 0 will cause the wind to have no effect.s |
| Wind Speed |
|
| Wind Direction | Careful, this is not a normal vector, instead they are multipliers of Wind Speed, for example 0.5, 1 and 0.5 means that the windspeed is half in x and z and full value on y. |
| Wind Noise | For add random directions in the wind |
| GROUND PLANE | |
| Use Plane | If you turn this on, an immaginary plane will be located at the position of Plane Origin, and it will behave like a Passive Collider. |
| Plane Origin |
|
| Plane Normal |
|
| Plane Bounce | Default 0, with value 1 you are telling the all energy from an object hitting the plane will be applied back to it, which results in bouncing. |
| Plane Friction |
|
| Plane Stickiness |
|
| SOLVER ATTRIBUTES | |
| Substeps | How many times solver's calculations will be done at each frame, by default 3. You can increase it to 6 for example for higher detail on the animation, however resulting in slower playback. |
| Max Collision Iterations | During each of the substeps, how many times should I check for collisions. Default 4, you can increase it for example to 32 for much higher collision details, however it will drastically decrease playback speed. |
| Collision Layer Range | If you want to use collision layers, for example 1, 2, 3 and 4. Remember that by default collision layer range is 4, so anyway they still will be all considered in the calculations. In order to make this collision layer setup working, you need to decrease layer range to 0.5 for example, so that all these 4 objects will be separately evaluated. If you set it to 2, maya will combine 1 and 2, and 3 and 4. |
| Timing Output |
|
| TIME ATTRIBUTES | |
| Current Time | This value in connected to the timeslider. |
| Start Frame | Changing the default value of 1, means that the nucleus begins to evaluate the nCloth at that specific frame. For example if you want flowers petals to start falling at frame 100, just type in 100 in start frame. A suggestion with complex scenes is to set this value very low ex 0.1and then cach it and speed up the cache. |
| Frame Jump Limit |
|
| SCALE ATTRIBUTES | |
| Time Scale | Very important attribute, default 1 means that for each frame in the timeline the nucleus is evaluated one time. If you decrease it to 0.5 then for each frame 2 calculations are done, resulting in a smoother, more accurate but also a bit slower simulation. If you change it to 2, then the simulation is running twice as fast as the timeslider, resulting in big fast steps. |
| Space Scale | An important attribute, by default the value is in Meters, which means if you have a flag that is 5 edges width, means that it is 5 meters wide. If you wanna change the metric system to Decimeters type in 0.1, and to Centimeters type 0.01 |
| NODE BEHAVIOR | |
| Caching | |
| Node State | |
| Enable (On) | Enables or Disables nCloth Calculations for the current mesh |
|
Collisions |
||
| Collide (On) |  |
Enables or Disables Collisions for the current mesh |
| Self Collide (On) |  |
The nCloth will collide with itself, for faster playback you can disable this feature if no significant self collision effects are needed. |
| Collision Flag (Face) |  |
Lets you specify which of the polygon's components will calculate collisions:
Notice in the video how the right cube penetrates the nCloth, this is due the fact that beeing set to Vertex, faces are not calculated therefore they penetrate. |
| Self Collision Flag (Vertex Face) | 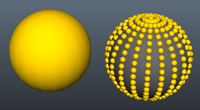 |
only for nCloth, for Passive Colliders this attribute is ignored, as they don't self collide.
|
| Collide Strength (1) |  |
Varies from 0, which is the same as turning off collisions, to 1, which will enable full collision strenght between nCloth and other Nucleus. |
| Collision Layer (0) | If for example you have 2 flags and 2 poles, you can select one pair of them and give them collision layer 1, and the other pair to have collision layer 2. This will separate these two pairs from interact with each other, allowing faster simulation. Infact, by default all collision layers are set to 0, which means that every objects interacts with each other. |
|
| Thickness (0.024) |  |
How thick the surfaces is for collision calculations with other passive colliders. Remeber that this attribute is not related with self collision properties, which instead self collision width scale does. Collisions happen on the collision volume, not on the polygon itself. |
| Self Collide Width Scale (1) |  |
Self Collision Thickness = Self Collide WIdth Scale * Thickness So by default 1, self collision thickness is equal to thickness attribute, with value 0.5, only the half. same as thikness attribute but this is related only to self collision, not with other objects. |
| Solver Display (Off) | 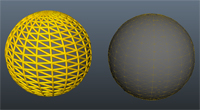 |
displays in the viewport these collision attributes
|
| Display Color (Yellow) | 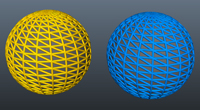 |
Specifies the color of the collision volumes for the current nCloth object. Display Color is only visible when your scene view display mode is set to Shading > Smooth Shade Selected Items or Shading > Flat Shade Selected Items. Remember that Display Color has no effect on calculations or render. |
| Bounce (0) | Specifies the springiness or bounciness of the current nCloth object. Bounce determines the amount of the nCloth’s deflection or rebound on collision with itself, nParticle objects, passive objects, or other nCloth objects that share the same Maya Nucleus solver. 0 simulates materials like concrete and 0.9 like rubber. Values greater than 1 sould be avoided as they create unpredictable results. |
|
| Friction (0.1) |  |
default 0.1, usually looks unnatural as the cloth slides along surfaces as if they were very slippery. By increasing this value the cloth will behave more sticky. This simulation is also influenced by Stickiness. This value is calculated in tangent direction. |
| Stickiness (0) |  |
how much nCloth tend to stick to another, this value is calculated in normal direction. |
Dynamic Properties |
||
| Stretch Resistance (20) |  |
Its ability to resist beeing stretched when pulled. So higher values will make it stiffer while lower values will make the cloth behave more elastically. |
| Compression Resistance (10) |  |
Is the opposite of stretching, it controls how much the vertices resist to beeing compressed to each other. This attribute takes action when the nCloths links are less then the original mesh's. Note, although I've used a cube for demonstration, this applies also to open meshes, for example, with default value, a blanquet would not completely cover a sleeping character and you would think Bend Resistance is responsible. However if you 0 this value you'll see that immediately the blanquet will perfectly fold around the character. |
| Bend Resistance (0.1) |  |
How much the mesh resists to bending over edges, with high values, the cloth will almost not bend, behaving like an inflatable object full of air. |
| Bend Angle Dropoff (0) |  |
A high value will cause the cloth to resist being bent at high angles more than at lower angles. In this video the same Bend Resistance value has been used. |
| Shear Resitance (0) |  |
similar to stretch resistance, but is applied along the crosslinks between particles of the nCloth. Shearing causes the nCloth to stretch in an unequal fashion, causing distortion. Usually default 0 is acceptable, stretch resistance and compression resistance keep the cloth from shearing. Also, shear resistance can be slow to calculate. Left is stretch resistance and right is with shear. |
| Restitution Angle (360) |  |
The degree which nCloth is allowed to bend across edges before it can no longer return to its rest angle (this only if no forces are acting upon the nCloth) |
| Restitution Tension (1000) |  |
When no forces are acting upon the nCloth, specifies how far the links in the current nCloth object can stretch before they can no longer return to their rest lengths. Use Restitution Tension to simulate a substance like silly putty being stretched. |
| Rigidity (0) |  |
Specifies how much the current nCloth object wants to act as a rigid bodyA value of 1 makes the nCloth act as a rigid body, while a value between 0-1 makes a hybrid between cloth and rigid body. |
| Deform Resistance (0) |  |
Specifies how much the current nCloth object wants to maintain its current shape. This value determines the degree to which deformations and collisions during simulation impact the nCloth surface. Note that this attribute does not depend from the orinal mesh, which is the case of Input Mesh Attract. |
| Input Mesh Attract (0) |  |
How strongly the nCloth tends to take the same shape and form of the original mesh. |
| Input Attract Damp (0.5) |  |
The delay the cloth has by following the orinal mesh, if this value is 0, the cloth will stick to the original mesh (rest position), if you increase this value, the cloth will delay and react more to the motion. |
| Rest Length Scale (1) | Determines how the rest length is dynamically scaled from the length determined at the start frame. |
|
| Bend Angle Scale (1) | Determines how the bend angle is dynamically scaled from the bend angle determined at the start frame. A Bend Angle Scale value of 0, makes the rest shape flat. |
|
| Mass (1) |  |
determines the density of an nCloth or the weight of an nCloth when the nucleus' gravity is greater than 0. This value should be based by its type of fabric or material. For example, 0 is appropriate for silk and 1 for felt. Mass affects behavior in collisions and behavior with Drag. nCloth with high Mass has greater influence on nCloth with low Mass, and it’s less influenced by Drag. |
| Lift (0.05) |  |
related to wind, first of all activate wind speed from 0 to a higher value. This will alter the way cloth falls through the environment, for example falling leaves. Lift is the perpendicular direction to the wind. Is the component of aerodynamic force perpendicular to the relative wind. For example, you can use Lift (with Wind Speed and Drag) to create the rippling effect of a flag blowing in the wind. |
| Drag (0.05) |  |
same as lift, but parallel to the relative wind which causes resistance. |
| Tangential Drag (0) |  |
How much to consider the normal direction of polygons. It biases the effects of drag relative to the surface tangent of the current nCloth object. For example, a Tangential Drag of 0.0 causes a flat plane to slice through the air with no resistance and only have drag when moving along its normal axis, and a Tangential Drag of 1.0 causes the effects of drag to be equal in all directions. |
| Damp (0) |  |
From Wikipedia: "In physics, damping is any effect that tends to reduce the amplitude of oscillations in an oscillatory system, particularly the harmonic oscillator". But too much damping will make the cloth look like float in the air. Damping progressively diminishes the movement and oscillation of nCloth by dissipating energy. |
| Stretch Damp (0.1) | Specifies the amount velocity due to stretch is damped for the current nCloth. Stretch Damp allows your nCloth to stretch without bouncing. Also, where Damp affects the bend and overall rotation of your nCloth, Stretch Damp only affects stretch. |
|
| Scaling Relation (Link) |  |
specifies the way dynamic attributes such as Bend and Stretch are defined relative to the scale and vertex density of the current nCloth object
|
| Ignore Solver Gravity (Off) |  |
by default, when an nCloth is created it will automatically fall affected from the solver's gravity. You can prevent this from happening simply by turning this feature on. |
| Ignore Solver Wind (Off) |  |
doesn't take into account the wind attribute of the nucleus |
| Dynamic Property Maps | ||
| Maps (none) |  |
|
| Type (Texture) | 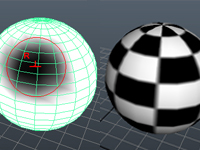 |
Under nMesh> Convert vertex to you can switch between texture and vertex map. |
| Wrinkle Map (none) |  |
modifies the internal rest shape of the nCloth input mesh by displacing it along its normals. The amount of displacement is determined by the Wrinkle Map value at each vertex, which is then multiplied by the Wrinkle Map Scale. When the nCloth is simulated, it tries to achieve the displaced shape instead of its normal rest shape. The rest shape is only used for determining the nCloth’s Stretch Resistance and Bend Resistance. The nCloth object’s Input Mesh Attract and Rigidity are not affected by the Wrinkle Map. When applying a wrinkle map to an nCloth mesh, the wrinkle offset is to one side only, in the direction of the normals. To make positive and negative wrinkles, set the Alpha Offset value to -0.5 on the wrinkle map texture node. |
| Wrinke Map Scale (1) |  |
Determines the displacement of a wrinkle map. A negative value pushes wrinkles in, instead of out. If your scene scale is large, this value should also be large. The default value is 1. At large scene scales a high Wrinkle Map Scale value is required to account for world space displacement. |
| Force Field Generation | ||
| Force Field (Off) |  |
If On, nCloth will generate wind from itself, remember that both nCloth and passive colliders can Generate Wind.
|
| Field Magnitude (1) |  |
Sets the strength of the Force Field. Positive Field Magnitude values push nParticle objects and other nCloth objects away from the current nCloth. Negative Field Magnitude values pull nParticle objects and other nCloth objects toward the current nCloth. |
| Field Distance (1) |  |
Sets the distance (in field units) from the surface of the force generating nCloth that the Force Field is active. Outside the Field Distance, the Force Field does not affect nParticle objects and other nCloth objects |
Selected Position and Selected Value |
 |
|
| Interpolation (Linear) | 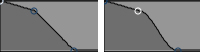 |
The left one is deafult linear, the right is smooth. It is simply the tangent curve. |
| Field Magnitude Map (none) |  |
Lets you assign Magnitude Values with a Texture or Vertex Map. In this example notice how the dark side of the propeller does not affect the cloth, while the bright side does. |
| Wind Field Generation | ||
| Air Push Distance (0) | done | Specifies the distance over which the wind created by the motion of the current nCloth object affects other nCloth objects in the same Nucleus system. The motion of the current nCloth object determines the direction of the wind. When Air Push Distance is 0, no wind is generated by the motion of the current nCloth. When Air Push Distance is greater than 0, the wind created by the motion of the current nCloth object affects other nCloth objects in the same Nucleus system. The higher the Air Push Distance, the greater the distance over which the wind created by the motion of the current nCloth affects other nCloth objects in the same Nucleus system.
|
Air Push Vorticity (0) |
done | Specifies the amount of circulation or rotation in the flow of air being pushed by the current nCloth object, as well as the amount of curl in the flow of wind created by the motion of the current nCloth object. Air Push Vorticity changes the direction of the wind created by the motion of the current nCloth object. Air Push Vorticity only affect’s your nCloth when Air Push Distance is greater than 0. |
| Wind Shadow Distance (0) | Specifies the distance over which the nCloth object blocks the dynamic wind of its Nucleus system from other nCloth, nParticle, and passive objects in its system. When Wind Shadow Distance is 0, no wind is blocked by the current nCloth object. When Wind Shadow Distance is greater than 0, the dynamic wind of its Nucleus system is blocked by the current nCloth object. The higher the Wind Shadow Distance, the greater the distance for which the current nCloth object blocks the dynamic wind of its Nucleus system. |
|
| Wind Shadow Diffusion (0) | Specifies the amount the dynamic wind curls around the nCloth object as it blocks the dynamic wind of its Nucleus system. |
|
| Wind Self Shadow (Off) | when on, the nCloth object blocks the dynamic wind of its Nucleus system for affecting itself. |
|
| Presure | ||
| Pressure Method (Manual Pressure Setting) | 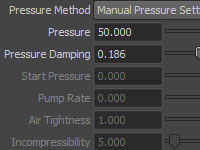 |
specifies how the pressure value is defined
|
| Pressure (0) |  |
specifies a force applied along the surface normal direction of the current nCloth object when the Pressure Method is set to Manual. (Pressure and Pressure Damping the only attribute available when Pressure Setting is set to Manual Pressure Setting) Note that pressure can also have a negative value for simulate an imploding object. |
| Pressure Damping (0) |  |
the amount the air pressure is damped for the nCloth |
| Start Pressure (0) |  |
the relative air pressure inside the current nCloth object at the start frame. |
| Pump Rate (0) |  |
the rate at which air pressure is added to the current nCloth object. |
| Air Tightness (1) |  |
The rate at which air can escape from the nCloth, or how permeable it is. |
| Incompressibility (5) |  |
specifies the incompressibilty of the current nCloth object's internal air volume. This also affects the amount of force applied when air is pumpd into the nCloth. note that a higher Incompressibilty value may require more solver calculation time. |
| Seal Holes (on) |  |
By defaul polygons are treated as closed, even if there are actual "holes". |
| Quality Settings | ||
| Max Iterations (10'000) | Denser meshes require more collision iterations, this will reduce cloth vibrations. Specifies the maximum number of iterations per simulation step for the current nCloth object’s dynamic properties (for example, Stretch Resistance and Bend Resistance). Max Iterations clamps the number of iterations to prevent high level property values or a large number of substeps from locking up the nCloth. An iteration is a single computation of a single nCloth property by the Maya Nucleus solver. There are many iterations for each dynamic property value per step. The number of iterations for each dynamic property is automatically set by their current values. Higher dynamic property values generate larger numbers of iterations. |
|
| Max Self Collide Iterations (4) | Specifies the maximum number of self-collision iterations per simulation step for the current nCloth object. Accuracy increases with increased iterations, however, calculation time also increases. |
|
| Add Cross Links (On) | Adds cross links to the current nCloth object. For faces with more than 3 vertices (triangles), this creates links such that each vertex is connected to each other vertex. Quads are better balanced with cross links, than if they are triangulated. Cross links maintain the angles between links, stabilizing the nCloth and preventing cloth behavior like shearing. You can not add cross links to meshes that were triangulated before being made nCloth, as their extra edges already provide additional stability to the nCloth. |
|
| Evaluation Order (Sequential) |
|
|
| Bend Solver (High Quality) |
Note If you set Bend Solver to Flip Tracking and want to append an nCache or play back off the end of an nCache, you must set Cacheable Attributes to Dynamic State when you cache the simulation |
|
| Sort Stretch Links (Off) | When on, the current nCloth object’s links are sorted. With a Sequential Evaluation Order, Sort Stretch Links bases the link order on distance to colliding and constrained points on the nCloth. This can help reduce stretching without increasing the Stretch Resistance value, although the effect can be subtle |
|
| Trapped Check (Off) | When on, Trapped Check pushes out along the surface normal of the current object to resolve crossovers between colliding objects, and attempts to push the points that cross over, back. The push out force is exerted on the outside of the current object's surface (positive normal side). Trapped Check assumes that the collisions are occurring on the same side of the object's respective surfaces (For example, outside surface to outside surface collision). |
|
| Self Trapped Check (Off) | When on, tracks self collision crossovers and attempts to push the points that cross over, back. This setting assumes that the surface of the object is in a good state at the start, and attempts to preserve that state. The Self Trapped Check is useful in cases where nCloth is self-colliding and causing interpenetration. Instead of the geometry being stuck on the wrong side, the Self Trapped Check allows the cloth to push back to the correct side. |
|
| Push Out (0) | A force that pushes out objects that are intersecting or interpenetrating, to the nearest point on the current nCloth object’s surface. A value of 1 pushes objects out in one step, while lower values push out in more steps but provide smoother results. A positive Push Out value results in objects pushing in the direction of the surface normal. A negative Push Out value results in objects pushing in the opposite direction of the surface normal. Push Out relies on the Push Out Radius to determine which objects and points are affected (objects and points farther than the Push Out Radius are ignored). Push Out is useful for objects colliding at the start frame. In addition, you can animate this attribute to resolve a bad state at certain frames. |
|
| Push Out Radius (0.098) | Specifies the maximum distance from the surface of the current nCloth object that the Push Out attribute affects. Objects that are farther away than the distance specified by the Push Out Radius are not affected. Important The Push Out Radius determines how far from the surface Maya checks for push out. The push out is always applied to the surface thickness. Push Out Radius is not a type of surface thickness. |
|
| Crossover Push (0) | A force applied to objects along the contour where they crossover with the current nCloth object. Crossover Push works only at the point of crossover so it may take several steps for the surface to reach a good state. Use Crossover Push to resolve interpenetration at the start frame, or to correct sharp edges. |
|
| Self Crossover Push (0) | A force applied along the contour where the current nCloth object crosses itself. Self Crossover Push works only at the point of crossover so it may take several steps for the surface to reach a good state. Use Self Crossover Push to resolve interpenetration at the start frame. |
|
| Caching | ||
| Play From Cache ( only in channel box) |  |
once you go in nCache> create a new cache, this attribute will turn on, which means that the deformation of the polygon will not be calculated anymore from the nucleous but simply readen from the cache file, this enables you to move the timeslider manually and even play the animtion backwards. |
| Cacheable Attributes (Position) |
|
|
| Diagnostic Settings | ||
| Cache Usage (None) | ||
| Time Attributes | ||
| Start Frame | ||
| Current Frame | ||
| Object Display | ||
| Visibility (On) | ||
| Template (Off) | ||
| LOD Visibility (On) | ||
| Intermediate Object (Off) | ||
| Ghosting (off) | ||
| Ghosting Control (Global Prefs) | ||
| Pre Step (3) | ||
| Post Step (3) | ||
| Step Size (1) | ||
| Custom Frames (none) | ||
| Start Frame (0) | ||
| End Frame (100) | ||
| Ghost Driver (none) | ||
| Bound Box Min (0) | ||
| Bound Box Max (0) | ||
| Enable Overrides (Off) | ||
| Display Type (Normal) | ||
| Level of Detail (Full) | ||
| Shading (On) | ||
| Texturing (On) | ||
| Playback (On) | ||
| Visible (On) | ||
| Color (Grey) | ||
| Node Behaviour | ||
| Caching (Off) | Specifies the simulation data that will be saved to a server or local hard drive when the current nCloth object is nCached. |
|
| Node State (Normal) | ||
| Extra Attributes | ||
| Goal UV Set Name |
|
|
In the AE, on the right top there is a preset button where you can choose between these 20 presets.
Just like with particles, you can apply any field by selecting the nCloth and Field> ....
in maya preferences make sure to activate play every frame for allow nCloth to be correctly calculated.
After a nCloth simulation you can smooth the geometry for render, however the object will still behave the same, no more vertices were added to the dynamic calculations. If you want high details for the geometry calculation you have to smooth it before creating the nCloth
When you want to work on keyframing a character without working on nCloth, you can disable it for faster playback.
Modify> Evaluate Nodes> Nuclei, this will ignore all nDynamics calculations.
Used for constraint components of an nCloth to components of any other geometry, nCloth, Passive Collider or even a normal polygon. Remember that wether you select faces, edges or vertices, the constraint is always done to the vertices.
| Transform | 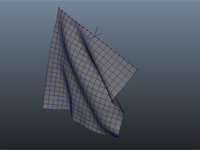 |
In the example the top row of vertices are pinned to the animated locator, for do so:
A new locator will be created to which the components are constrained. An interesting way around, if for example you have a flag with its border penetrating a cylinder, you could just increase the thickness property of the cylinder for cause the flag to remain sticked to it. This is caused due the fact that the flag's vertices will be trapped between the cylinder's vertices, maya will consider it as a collision and won't allow these vertices to pass through. |
| Component to Component | 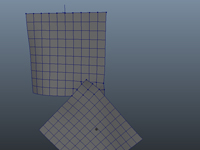 |
In the example the bottom vertices of the top mesh are constrained to the top vertices of the bottom mesh. For do so:
|
| Point to Surface | 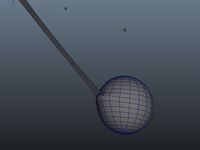 |
In this example I've attached the bottom vertices of the rope to the sphere. For do so:
|
| Slide on Surface |
|
|
| Weld Adjacent Borders |
|
|
| Force Field |
|
|
| Attract to Matching Mesh |
|
|
| Tearable Surface | 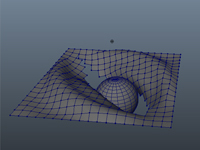 |
In this example the key framed passive Collider (sphere) tears the nCloth apart. For do so:
What happens is that the object has been separated into individual faces and the constraint is holding them together. Two more nodes have been created: polyMergeVert and polySoftEdge. In the AE you'll find attributes for control their resistance of tearing, suhc as glue.... |
| Disable Collision |
|
|
| Exclude Collide Pairs |
|
You can set a specific keyframe to be the inital shape of the nCloth, for example, once a nCloth blanquet has fallen on the sofa you want to use this new position as the beginning one, so:
select the nCloth and nSolver> Initial State> Relax Initial State
Doing so will simulate a number of iterations for the cloth and resave its initial state.
nSolver> Interactive Playback allows you to test nCloths without setting keyframes, basically once you turn on this feauture you can just move a passive collider into the nCloth for see its effect.
When you create an nCloth maya will duplicate the polygon and use the original one for calculate the position of the nCloth mesh.If you want to go back to see the original mesh, what you have to do is select the nCloth and nMesh> Display Input Mesh.
What happens is that you will see the non-deformable original mesh, for go back and see again the deformed mesh select it and nMesh> Display Current Mesh
By default, all nCloth calculations are done by one solver, however, you can create a new solver and apply it to specific nCloths with these reasons:
lets you choose which properties you are going to see in the Attributes Editor, for example, shader are not visible by default.
The options are: dynamicConstrai Nodes, Material Nodes, nComponent Nodes, Property Maps, Transforms and other non-nucleus nodes.
nCloth caches only store the XYZ positions of an nCloth object's vertices, not the translation, rotation, or scale of the nCloth's Transform node.
Then cache will be safed in the project folder inside Data folder.
You can delete the cache for simulate again with nCloth by nCache> Delete Cache, remember that you can keep the cache file in your
folder and reuse them in future.
If you want to detach the mesh from the simulation for render a still image (and want to move some vertex) you simply duplicate the mesh (Ctrl D), this new polygon will not have any link to the Nucleus.